
Don't you just love this time of the year?! The food, the friends, family...and did I mention food?! We hosted our first annual Friendsgiving on Sunday and had the best time, so I wanted to pop-in real quick and share some ideas that can easily be used on Thanksgiving Day or even your own Friendsgiving! So let's cut right to the chase because if you're anything like me, you're probably running a million miles a minute trying to get the house...and the food!!!!...ready for Thursday's festivities.

I wanted the adult table to be festive and simple. I bought a roll of kraft paper and ran it down the center (cheap and easy!) and then created a tablescape using white candles, tapered candles for a little heigth, and faux hydrangeas, pumpkins, and greenery. Turned out so much better than I could've expected and it was SO simple and easy to do!

I also set out these great little utensil pockets for a fun little touch. I printed them on Kraft paper (you can find this at Hobby Lobby or Michaels) and then just assembled using scissors and tape. SUPER SIMPLE. I stuffed the pockets with a napkin, a faux leaf (snagged a bag at Hobby Lobby for less than a dollar!), and fork & spoon. Done and done!

Next up, kids table. Okay. So I know this is kind of ridiculous, but whatever. I enjoy stuff like this. I guess it's the teacher in me :) I wanted our first annual Friendsgiving to be just as fun and special for the kids as it would be for us.

I decorated the table with my blanket scarves. Easy to just throw in the wash if they got dirty.

I found a packet of Thanksgiving place mats for the kids...they're all these different coloring pages and they were absolutely perfect for keeping the kids busy while everyone was eating. The plates went on top of the placemats and I placed a couple of buckets of crayons on the table, too. I found some cute turkey plates at Hobby Lobby (80% off!!!) and covered each with a napkin. Then I placed a sugar cone filled with two bags of fruit snacks on eat plate. Little CONEcopias, haha. The kids LOVED them!

The paper bag turkey legs were ridiculously easy to put together too. Not only did they add a fun touch to the table, but they were a great little party favor for the kids. They loved tearing them open! I filled them with leftover Halloween candy :) I needed it OUT of my house!

I covered the juice boxes with brown construction paper (I just measured the width by placing the box on top of the paper...remove the straw!) and adhered a beak, a pair of googly eyes, and some colorful paper feathers. My boys were obsessed.

I found a little packet of seasonal paper strips for chain making (Michaels) and my boys loved putting together the paper chains the night before and then adding them to the table. They were so proud of their contribution to the table decor.

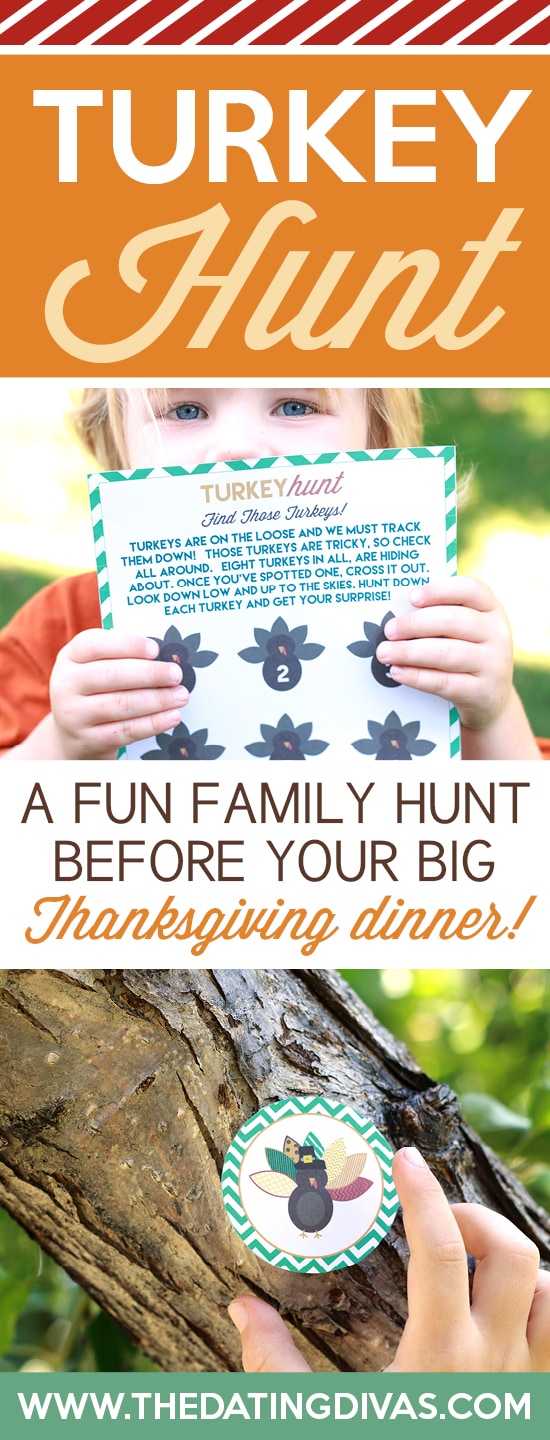
Speaking of kids, we knew they'd be anxious to eat while everything was finishing cooking, so we had the guys hide little paper turkeys outside and the kids had to go around and find all eight before they could come inside to eat. The guys did an AMAZING job of hiding them because it took the kids FOREVER to find all 8! Hahaha!!! PERFECT!! I found this darling idea from The Dating Divas. Head on over to their blog to download for your Thanksgiving festivities!
Now let's talk food and drink...the real reason we were so excited for Friendsgiving! Two Thanksgiving dinners in one week?! YES, please!!!!
I wanted a seasonal appetizer to set out before our feast (in addition to several others!) so I made these roasted cranberry crostinis. Verdict?! Pretty tasty. They were REALLY tart, so I didn't enjoy them as much as I thought I would, but they did get rave reviews from a couple of our friends. Bonus?! They were REALLY EASY to make and the best part is that they can be prepared several days ahead.

ROASTED CRANBERRY CROSTINIS
1 baguette (sliced into 1/2" thick slices)
12 oz. bag fresh cranberries
2 whole oranges
1/3 C. granulated sugar
Whipped cream cheese, to taste
Here's what you'll do:
Preheat oven to 350 degrees and slice the baguette into 1/2" thick slices. Place the sliced on a baking sheet and cook in oven for about 10-12 minutes (or until they're crispy enough for your liking).
In a separate bowl, toss in cranberries, the juice of one orange, and sugar. Stir to coat. When cranberries are coated, place the mixture on a baking sheet covered in parchment paper and transfer to oven. Roast cranberries for about 25-30 minutes, remove from heat, and set aside.
Spread the whipped cream cheese over the baguette slices and top with the roasted cranberries. I let mine cool overnight in the fridge. When I was ready to assemble, I removed them from the fridge and topped evenly over the cream cheese baguette slices.
Zest the other orange over each crostini and serve!
Again, they were pretty tasty..just a little too tart for my taste palate...but good nonetheless! A really easy treat to serve this time of the year.
I really wanted green beans to make an appearance, but instead of the traditional green bean casserole, I opted for something a little different. Brown sugar and bacon green beans. OHMIWORD. Delish!

BROWN SUGAR & BACON GREEN BEANS
2 lbs. fresh green beans, ends trimmed
6-8 strips of bacon, cooked and crumbled (or more if you love bacon :)
2/3 C. light brown sugar
2 TBSP. dijon mustard
1 TBSP. minced garlic
Salt & peper, to taste
Here's what you'll do:
Cook beans in a large pot. Cover with water and bring to a boil. Boil until beans are tender and easily pierced with a fork. Remove from heat, drain, and rinse with cold water.
In a large skillet, cook bacon for 6-8 minutes and add in brown sugar, mustard, and garlic. Stir to combine.
Toss the green beans into the skillet and mix to coat. Cook for an additional 6-8 minutes or until the beans are thoroughly coated in the bacon/garlic/mustard/sugar mixture. Season with salt and pepper, to taste.
Y'all. These were DELICIOUS. If you like green beans and bacon, I think you'll LOVE these. There was a definite sweetness (thanks to the sugar) to the side dish, but amazing nonetheless. Why have I not had these before?!?! They'll definitely be making an appearance again!!!
Last, but not least, I really wanted to serve a seasonal cocktail. When I found this one from Mel's Kitchen Cafe, I knew I found a winner!

CRANBERRY CIDER COCKTAIL
1 C. fresh cranberries
1/3 C. water
1/2 C. white sugar
4 C. apple cider - all we could find was the Tree Top brand
2 C. Ginger Ale
2 TBSP. fresh lemon juice
2 C. cranberry juice -we used Ocean Spray
Vodka - to taste :)
This is actually a recipe for a simple punch (sans alcohol) and can be served to the whole family as is. If you're wanting a cocktail, we added vodka, but I can also see this being really good with rum, too.
Here's what you'll do:
Combine the cranberries and water in a small saucepan and simmer over medium heat until the cranberries pop open/split. Remove from heat when split and stir in the sugar.
Allow the cranberry/sugar mixture to cool to room temperature. We placed it in the fridge to speed up the process. Once cooled, transfer the cranberries to a 2 qt. pitcher. Stir in apple cider, cranberry juice, ginger ale, and fresh lemon juice. Mix until combined and serve over ice.
You can add the alcohol to each drink individually OR you can mix it in before serving. We opted to mix it in because we knew this would be an adult drink only. I honestly don't know how much we used, but no one was falling on the floor and no one got sick, so I'm thinking it wasn't anything crazy ;) However, it was absolutely DELICIOUS!!!!! We will DEFINITELY be serving this one again. One of our dear friends said that it's her new favorite drink. Winner!!! I think it would be GREAT with muddled mint, too!!
Okay, so I think that's it! Hopefully you'll be able to incorporate some of these ideas and recipes into your Thanksgiving or Friendsgiving festivities, too!
Gobby 'til you wobble, y'all!
Thanks so much for your amazing inspirations! It must have been a fun Friendsgiving. I just printed off your silverware holders--on colored paper but they are just as cute.
ReplyDeleteI LOVE it all!!! Thanks for sharing your ideas!
ReplyDelete