Showing posts with label Halloween. Show all posts

Monday, November 2, 2015

Leftover Candy= Decadent Dessert

It's the Monday after Halloween weekend and I am still suffering from a candy hangover.  And lack of sleep.  My groggy disposition today was worth it.  Even through the pouring rain, we still managed to enjoy our fun-filled Halloween weekend like crazy.

I went to a costume party with some friends on Friday night while Mr. Spouse was working one of his last football games of the season.  Since we weren't going together, I went as a wind-up baby doll.  I had everything on hand so it was cheap and easy!  My boys were extremely creeped out and refused to give me hugs and kisses as I was leaving.  


We had our friends and family over Saturday night for a little trick-or-treating and Halloween party fun.  I made my traditional pot of chicken tortilla soup....


...and Mr. Spouse dressed up the trailer with hay bales and Halloween lights to take us all trick-or-treating.  Like I said before, it rained like crazy, but that didn't stop us.  We took the umbrellas and rain boots and made the best of it.  There was nothing stopping the kids from getting their holiday candy fix.  When we got home from our hay ride we had a few trick-or-treaters still stopping by, so my oldest insisted on handing out the candy while the grown-ups played :)  He was giving out huge handfuls and when he reached the bottom of the stash he started giving out his own candy.  He has the sweetest, most giving little heart.


My mom dressed up this year and her black lips and black hair scared the pieces out of my nephew.  And while we're talking about my nephew, let me just tell you that his costume was nothing short of amazing.  He went as Marty McFly riding a hoverboard and dad went as Doc.  The boys went as a ninja and police officer and I decided to change into something a little more kid friendly so I went as a deer :)  Mr. Spouse was going to dress up as a hunter, but had a last minute costume change and dressed as one of his friends which made us all laugh more than it should have.  Hilarious.


I also made sure to grab a Count Frappula frappucino before Starbuck's stopped serving it after Halloween.  I'm pretty sure I drank all of my calories..and then some.. that day :)  


Speaking of calories, this cake is definitely not lacking in them.  But that's a good thing because the caloric intake is definitely worth it.  I served this candy topped dessert in honor of the sweet holiday and there wasn't a crumb left in the pan by the end of the night.  This was a frightfully delightful dessert and a new family...and friend...favorite.  And ridiculously easy to make, too.   If you have any leftover Reese's hangin' around, you NEED to make this asap!  

REESE'S PEANUT BUTTER POKE CAKE

1 box chocolate cake mix 
8 oz. cream cheese, softened
14 oz. sweetened condensed milk
1 C. creamy peanut butter
12 oz. Cool Whip, divided
12 oz. hot fudge, divided
8-10 Reese's peanut butter cups, crumbled


To prep this decadent dessert, you'll need to bake your cake according to the directions on the box. Bake in a 9x13 baking dish.  When it's baked and ready, remove from oven and immediately poke all over with a fork.

While the cake is still warm, heat up the hot fudge in the microwave and pour about 3/4  over the poked cake so that it all soaks in.

Set aside for about 20-25 minutes and allow cake to cool.  


In a large bowl, mix together the softened cream cheese and sweetened condensed milk.  

Now add the peanut butter and mix until combined.

And finally, add half of the cool whip and mix until smooth.

Now spread the peanut butter mixture on top of the cake.  

Top with the remainder of the Cool Whip and hot fudge and crumble the Reese's peanut butter cups on top of that to finish it all off.

Keep refrigerated until ready to serve.


This was one of the most decadent desserts my taste buds have ever enjoyed.  It was the perfect combination of chocolate, peanut butter, and everything else :)  Like I said earlier, this was worth every little calorie I consumed and there wasn't a bite left in the pan when the night came to an end.  The perfect addition to our holiday buffet.  Can't wait to serve this again!  

Friday, October 30, 2015

Halloween Treats - FUN for Kids!

Today's Halloween Eve and I'm just creepin' it real...


If we're being honest, I'll probably be creepin' it real tomorrow, too.  I'm still trying to decide what I want my costume to be....creepy?  or cute??  I think both.  I think I want something a little creepy tonight since we'll be going to a costume party, and something "cute" tomorrow since we'll be together as a family :)  It's supposed to rain all day tomorrow, too. BOO. 

Speaking of costumes, these two had their Book Character Day at school so they went as  Officer Buckle and Nighttime Ninja.  I'm dying laughing because my Officer Buckle bears a striking resemblance to Lieutenant Dangle (Reno 911, anyone?!?!) .  The glasses and 'stache were all his idea.  In his words, "you know what would make this costume epic?!?!?!"
   (insert crying laughing emoji here)


Our sweet pug, Lloyd Barker,  is joining us in the costume fun this year, too.  The force is strong with this one.
#bonepugsandharmony #pugsandkisses #pugsnotdrugs


The boys and I laughed way too hard putting this on him yesterday.  Lloyd, on the other hand, didn't find it quite as amusing.

Now let's talk about treats!!!  I ran up to school this morning to deliver our teachers  these little gift bowls and cookies.  I love shopping at Dillard's after season because they always have the best deals on holiday decor and other little trinkets.  I found these great little Halloween cookie cutters and "spooktulas" last year all for about $1 a piece!!!  I hesitated at first, but mom talked me into getting them and I knew they'd make fun little teacher gifts.  Then I found these great bowls at a trade fair for about $6 a piece and had to scoop 'em up to pair with the cookie cutters and spooktulas.  I also put in a little box of the boys' favorite cookies.


My boys absolutely LOVE these cookies!!!


These are super easy to make and you probably have all the ingredients on hand.  You can grab the eyes in the baking section (Wilton, I got mine at Target) and then just pick up a tube of the icing gel (Wilton, at Target) to adhere the eyes and make the spider legs.  

This year we added a few more things to the list to bake.  You should've seen the boys' faces!!  They were SO excited!!!  

First up, our FrankenKrispies!!!  There are a million different versions on Pinterest.  I would've loved to have added the little bolts on either side of the neck, but this momma was all about saving a little time.  I always wait 'til the last minute to do everything (shocker) and I didn't want to be up 'til midnight since I was making quite a few things :)  So this is how they ended up and the boys LOVED them!!!!  

These couldn't have been easier.  

FRANKENKRISPIES
3 TBSP butter, melted
1 bag mini marshmallows
6 cups Rice Krispies cereal 
Green food coloring
1 tube of red cookie icing

Melt butter in a large pan.  Add package of marshmallows to butter and stir until marshmallows are smooth and melted.  Remove from heat and add food coloring (I added about 6-8 drops, but you can add until the marshmallows are the desired color).  Mix in the Rice Krispies until evenly coated.  Grease a 9x13 baking dish and press the Rice Krispies in the dish until firm and even.  Set aside for about 30 minutes, or until firm.  Cut into even squares and remove from pan.  Melt the candy melts according to package directions.  Dip one end of each Rice Krispie treat into the melted candy and set to dry on wax paper.  Use the red cookie icing to adhere the eyes to the treats.  Use the cookie icing to draw the mouth as well.  

I saw these darling brownies on the Betty Crocker website and wanted to try.  Let me just tell you that I have a love/hate relationship with baking brownies.  I don't feel like I ever bake them the right way.  They're either underbaked or overbaked.  I haven't tried these yet, but I think we got a little half and half action goin' on.  Some of them looked spot on.  I think some were underbaked and I'm pretty sure there were a few that were overbaked, too.  Oh well.  While these are nowhere near as cute and detailed as the brownies pictured on the Betty Crocker website, they'll do just fine for the kids :)  I think this particular food craft was their most favorite!!!! (even though they look scary as heck.)


GHOSTMALLOW BROWNIES
1 box of brownie mix (baked according to pkg. directions)
1 bag of Jumbo Marshmallows
1 tub of vanilla or white frosting

Bake brownies according to package directions.  Remove from oven and set aside to cool for at least 1 hour.  Cut brownies evenly into squares and remove from baking dish.  Adhere one jumbo marshmallow to each brownie using a dab of frosting on the bottom of each.  Melt the remainder of the frosting in the microwave.  Pour a tablespoon of the melted frosting over each marshmallow until each is evenly coated.  Let the frosting set and harden for about 30 - 45 minutes.  Use the black icing gel to add the eyes and mouth.


These fun little food crafts were a great way to get us all in the kitchen and baking together.  They were a blast to make, albeit a teensy tedious and time consuming, and they are darling to boot!  The boys were SO excited to take some of their goodies to school today.  We made enough for my husband to take to his student trainers today, too!  Even big kids love Halloween treats :)

Have a  HAPPY (and safe) HALLOWEEN!!!!!!

Tuesday, October 27, 2015

Halloween Treats

I know I've said it before, but it bears repeating again.  

I LOVE HALLOWEEN!!!!  

I love everything about it.  Not the gore and the horror {although scary movies are my most favorite to watch}, but everything else.  There will always be a little kid in me that just wants to trick-or-treat, veg out on candy, and watch as many scary movies as I can.  And let's be real.  I sorta still get to do that, but nowadays I send my kids door-to-door and when we come back home to check out our loot, I take their candy...y'know, only the pieces that look unsafe to eat {aka: my favorites...sour patch kids & kit kats}.  Once the boys come down from their sugar high, we send them to bed and then stay up late watching old scary movies, laughing at the parts that used to freak us out as kids, and enjoy every last bit of that "unsafe" candy I took away from the kids earlier.  Life is good.

Now I want to share a few last minute Halloween treats if you're in search of something to send to school with your kids this week.

If there's any day in the school year that teachers need a little pick-me-up, it's the day before...and after...Halloween.  And Valentine's Day.  And, well, any day that involves copious amounts of sugar.
And let's take a minute to say "thank you" to those teachers at school this week.  Between Red Ribbon week, the week preceding Halloween, and a FULL MOON (Dear LAWD!...the perfect storm!!!), they need all the support...and sweets...they can get!!!


 But seriously, teachers need to know you stand with them in solidarity on this crazy, crazy week.  So we're sending our teachers a batch of homemade cookies this year because teachers like sugar, too :)  And hey, if you can't beat 'em, join 'em ;)  


About a week ago, my youngest was begging to make Peanut Butter Blossoms.  I've never made them before, but he had some at a friend's house and he couldn't stop talking about them.  So I went on a hunt for a recipe and then stumbled upon this recipe and picture.


DARLING!!!!  

I wanted to try it.  I really did.  But I decided a batch of regular PB Blossoms would do the trick because ain't nobody got time for all that.  And then I went to Target and found these little Wilton eyes in the baking section.  And a little squeeze tube of icing.  And then I was all, "I'll make time for that" because sometimes I like to torture myself and do things completely unnecessary.  

And it was fun.


I do realize that these guys look a lot more like the worm from "Diary of a Worm" than spiders, but hey...they'll work.


I bought these darling cookie containers at Dillard's last year a few weeks after Halloween.  I wish I would've bought more.  I scored 'em for a whopping $3 a piece!!!!  I LOVE scouring the sale shelves at Dillard's after season.  You can find the best stuff for the cheapest prices!  Perfect for gift giving!!!   I pulled them out the other day and knew our little spider blossom cookies would be a perfect fit!  Unfortunately, I only had two, so I improvised and pulled out another cookie jar I've been holding onto for a few years and I'll be using that one to send to school also.  


We gave these little boxes to the boys' teachers last year.  I found the printable from My Sister's Suitcase HERE and stuffed the boxes with a cozy pair of socks and foot cream.  Simple and sweet!  The cups were a fun treat for their friends...I just cut out & glued on a mouth {drawing them took too long!}, googly eyes, and filled them with cheese balls!  Couldn't have been easier!


My oldest wanted me to make goodie bags for his class again this year and I was totally on board.  Then I saw this on Pinterest {for the love!!!!}


I can't melt white chocolate without burning it every.single.time. so I wasn't really sold on the idea until I found these melts at Hobby Lobby.


SOLD.

So I made a class set of these for both boys to take to their friends tomorrow.  I mean, they'll get plenty of candy trick-or-treating, so this seemed like a pretty fun alternative and they really didn't take long at all to make! And they were SO easy!!!!! 


  I remember being in high school and still trick-or-treating.  {Confession:  I went trick-or-treating when I was a freshman in college.  I definitely dressed up as a cow and tagged along with my younger siblings and cousin.  Growing up at that point wasn't an option :)} I know "big kids" still like to trick-or-treat.  It's a tricky time because they wanna be all grown up, but they still want to do all the fun things kids get to do, too.  They don't want to let their childhood go.  I'm still trying to hold onto mine!  LOL.  My husband is an athletic trainer and works with the best kids.  They love fun treats and surprises.

I wanted to do something a little special for them to say 'thank you' for everything they do and hopefully make them smile.  Even big kids are still kids.  So they'll be getting these...


Of course, gauze would've been cuter, but all I had was crepe paper and it works just the same :)  I used a dollop of hot glue to adhere it in place then tied it all up with a little ribbon.  The paper inserts on the lid were printed and then cut out with a 2.5" circle cutter {found at Hobby Lobby}. It was the perfect size!  I didn't glue it down or anything...I just placed it on top of the lid then screwed down the rim to secure it in place.


The jars are filled to the brim with candy....good candy {there IS a difference! Ha!!!}  

Can't wait for Halloween!!  And if you're a teacher, God bless your sweet soul.

Tuesday, September 29, 2015

Home Tour Tuesday - The Halloween Edition

If you've been reading this little blog for any length of time, you know that Halloween is my absolute favorite time of the year.  It's such a fun and playful holiday.  Lends itself to so much creativity and imagination...and it brings back such great memories of my childhood.

We don't get into the "evil" of Halloween.  I personally don't think there's any evil to it, but that's just me talking crazy I guess.  I see Halloween as a time for costumes, candy, hayrides, trick-or-treating, and FUN.  (Did I mention candy??!?!?)   And that's just how we celebrate it in our little family.  Holidays...like anything else...are what you make of it :)  And we love to have fun with this one.

Being that I love Halloween as much as I do, it only stands to reason that the house is decorated and ready for all of the October festivities...and it has been since mid-September.  I decorate way too early, but no...it doesn't take the "special" out of the holiday.  It just lets us enjoy it a little longer :) While I do love Fall decor, I love Halloween decor thismuchmore.  And knowing how much my boys love it makes me that much more excited to decorate!

So welcome to Home Tour Tuesday...the Halloween Edition!


Let's step in and take a peek at how we decorated for Halloween this year.

First up let's talk about how my house smells this time of the year.  You can guarantee that one of these two candles will be burning when you walk in the house.  The Circle E Apple Strudel candle is one of my favorite scents by that company and those candles smell the entire house.  You can pretty much guarantee that my Candleberry Hot Maple Toddy will be burning ALL year long.  It's a warm scent though and perfect for this time of the year.  Hands down, BEST candle there is.  I get more compliments on that candle than anything else!  The entire house is filled with it's fragrance when it burns.  DELICIOUS!


While we're talking all about Halloween decor, I'm celebrating National Coffee Day today with my daily cup of Sonic's Red Button Roast.  Best coffee there is.  And it's best when served black.  Nothing extra needed.  Trust me. I can't drink coffee any other way anymore!
(In other news, I'm almost finished with my She Reads Truth study of Galatians.  Such a powerful study and beautiful reminder of God's promises to us!!  I highly recommend this one!!!)


Speaking of coffee, here's my (Halloween-ish) coffee bar set-up.


I switched out my other mugs for this collection and so far I've been able to find the BOO, TRICK,& TREAT mugs for October. I found them at Home Goods/Marshall's 
(the brand is Magenta).

Right next to the coffee bar is my little skull on a platter with a little chalk art I did on a mini-board from Michaels.  We set our keys on the platter when we walk in and "Skully" reminds us to pick them up before we head out the door every morning ; )


I added a simple little door hanger to the pantry door.  I found it at At Home for $8!  Sold!!


While we're in the kitchen, we'll take a peek in the breakfast room since it's attached.  Here's what's to the right of our breakfast table...


I took out all of my cups and creamers in this little display case and switched them out for these ridiculous skulls.  The boys got the biggest kick out of this when they first saw it!


The skulls are from Wal-Mart and they make for some really fun and playful pops of decor :) The Happy Halloween wooden sign was a find from Home Goods last year.  I think.  The skull pinwheel was .75 cents at Target in the party section a few years ago after season.  I'm glad I finally have somewhere to put it!

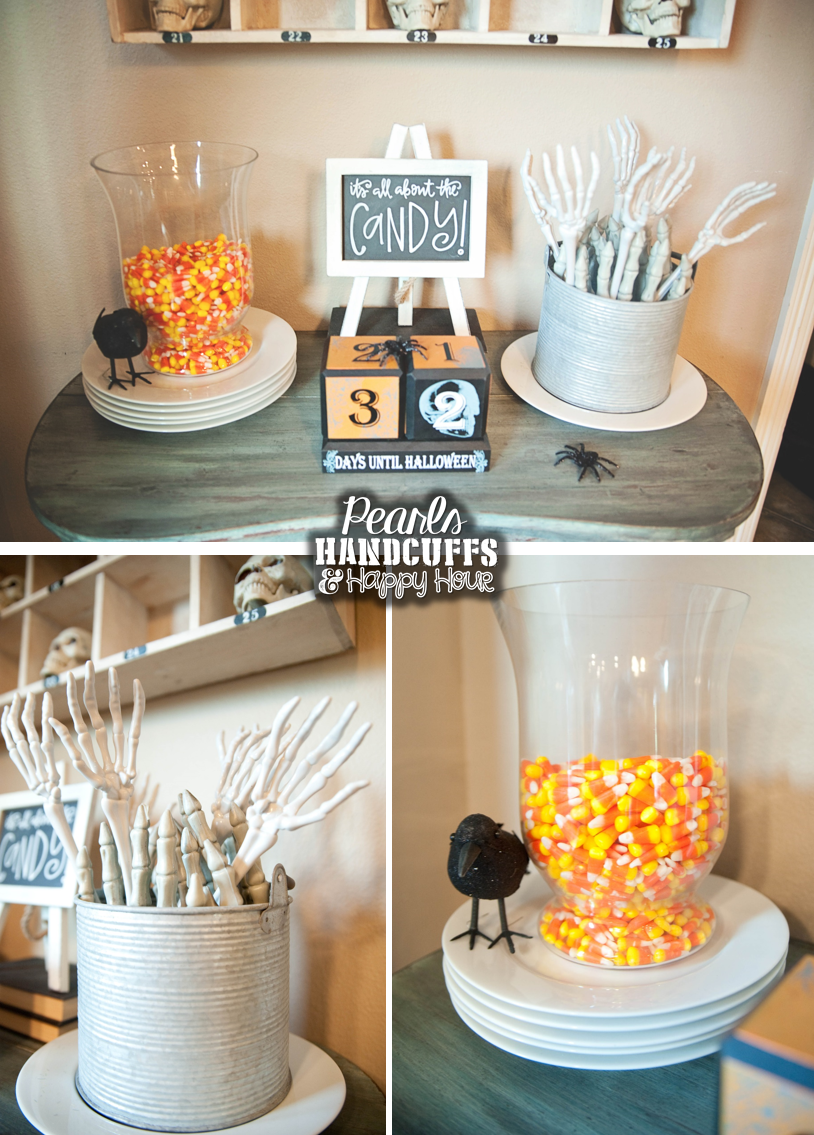
Here's the table set-up right below the display case.  It's a hodge-podge of randomness, but perfect for the space.  I'm sure you can guess what my boys love best here :)  #candycornforthewin
I found the countdown blocks at Marshall's (this year) and picked up the skeleton hands at the Dollar Tree.  I think they're actually serving tongs, lol!


I need to add some ribbon and a label to the candy corn jar.

Moving on...

On the wall to the left of the breakfast table is a buffet and shelves.  I usually take down all the decor on the shelves and put up all things Halloween.  This year I decided to keep it simple and save me a little bit of work.  I kept up most of what is usually displayed on the shelves and then added to it with pumpkins and other fun pieces. 


I found the "Eat, Drink, & Be Scary" sign at Marshall's this year and our scary little pumpkin boy had to make another appearance.  I love walking into the kitchen and seeing him turned backwards.  Mr. Spouse HATES that thing!  He turns him around every time he walks by it.  Makes me laugh.


This year our Martha Stewart bats moved from the dining room to the breakfast/living room(s).  They wanted a change of scenery, I guess :)  I know I could've cut my own, but I'm too lazy for that.  These have lasted me 4 good years and they're in great condition still!!
  #worththe5dollars


I switched out the decor on the table behind the sofa in the living room.  SUPER simple  Just added some spiders, webbing, and a table runner to the set-up.  Since the table runner is black I layered it on top of a lighter runner I already had to make it pop.  I got the black runner from Dillard's about 5 years ago.  The pumpkin is from Pier 1 (10ish years ago) is sitting in a little bed of Spanish Moss which I think jazzes it up thismuch ;)


While we're in the living room, let's peek at the built-ins.


I removed the decor from the two bottom shelves and just added a couple of simple things to the two shelves on top.  The Trick or Treat sign is from Marshall's (this year) and the two black pumpkins flanking either side were a steal at Kirkland's about 5 years ago.  They have a glow-in-the-dark picture on one side of either pumpkin, but I didn't like it so I turned them around and put them on a bed of Spanish Moss in little planters.  

I placed little orange berry stems in the wire jars on one of the top two shelves.  The very bottom shelf holds flameless candles sitting on top of Spanish Moss and those darling pumpkin/cat statues (Marshall's, this year).  I think the pumpkin was missing his head piece when I bought him, so I filled the cavity with Halloween straws :)  

The BOO sign was from Wal Mart last year and the Trick or Treat black cat sign was a fun find last year from Marshall's.  Overall, the built-ins were kept really simple this year. 


I changed out the mantle...again...this year and I know I say this every year, but I think this is my favorite!  I brought back all my "31's" to display together and then added some fun jars and pumpkins to decorate around them.  I love adding the cheesecloth to finish it all off and give it another texture/dimension.


I found the white pumpkins at Wal Mart (this year) and the labeled jars are either from Ross or Marshall's.  I would just snag them when I found them.  The black and white 31 sign was a fun find at Marshall's last year and I made the other two.  I also made the music sheet wreath.  You can see how I did that HERE.  The banner is a Martha Stewart special I found at Michaels several years ago and it was worth the $8 I spent on it. It still looks brand new!!!


I love adding books to any kind of vignette because I love how they add height and more dimension.  I typically turn the spines to the back for a more uniform look .  All of my books have the most randomly colored covers.


Here's what sits on our little hearth.  A lantern filled with random pumpkins and a basket filled with a blanket, pillow, and birch logs.


Our coffee table sits right between the couch and the fireplace and here's how I decorated it this year.


I decorated the tray as an ode to Edgar Alan Poe's "The Raven".  It's my NEVERMORE tray :)  
I absolutely love that skull/raven combo. The skull has an imprint of a map imbedded onto it so I used globes to decorate around it to play off that little motif.  I switched out the greenery in my jug for some bare branches and added another raven to the display to finish it all off.

Since the coffee table is pretty long, I decorated with this little set-up next to the tray.  I found the pumpkins at Target a few weeks ago (a tube of 8 for $6).  The bowl is from Tuesday Morning.  


Right behind the couch is our little sofa table and I really changed it up this year.  I haven't liked it a whole lot the last couple of years and knew I wanted it to look completely different this year. I found that table runner at Marshall's (this year).  I made the chalkboard and between that and the runner I had my inspiration for this year's set-up.  I like it SO much more than what I've done the last couple of years!


This is my black and white display :)  I just took my skulls and crows and arranged them as best I could, lol!  My boys requested the spider webs and I thought that was the perfect suggestion for this space!  I really do love it!  

The "mystery room" sits right next to this sofa table and here's what I did to it.  Not much :)  
SUPER simple!! 


I removed most of the decor from the shelves and replaced it with different Halloween signs, statues, and pumpkins.  I found the white pumpkins at Wal Mart and the rest is just a hodge podge of stuff I've collected over the years.  The pumpkin banner is from Wal Mart ( a few weeks ago) and I covered the boxwoods with more spider webs and added some little glittery spiders for a fun touch.  Simple and easy!


The dining room table looks a lot different than it has in years past, too.  I kept out the vase and candleholders like I normally do throughout the year, but I switched out the greenery for bare branches, added some black rock and baby skulls for filler in the vases, and then removed the candles and added white pumpkins to the candleholders.  Then I draped cheesecloth through my chandelier. I also switched out my table runner for this darling one I found at Marshall's last month. 
I need to move the wall of plates, frames, and my buffet all to the right (eventually).  Nothing in this room is centered and it drives me batty.


I didn't do much to my buffet, but I did take away some of my decor that usually sits there and added my mercury glass poison bottles and a few skulls instead.  To add more texture I set the bottles on top of a wood slice (found at Ross for $10).  I collected the bottles from a few different trips to Ross & Marshall's and I think displaying them together makes more of an impact.  I really love this little vignette!!


This little table sits in my dining room as well and it's simply decorated, too.  I love collecting globes and found this one a few months back at Ross for $10.  Sold.  The cloche and skull/raven are both from Marshall's.  I found that fabulous Trick or Treat serving tray at Home Goods a few weeks ago!!! 


The hallway table is super simple this year, too.  It's really not big enough for much more anyway.   I took my hydrangeas out of the planter box and filled it with pumpkins instead.  I found the planter and boxwoods at Ross this past spring.


Last but not least is our little powder bath in the hallway.  I covered the window with spider webs and added some glittery spiders for fun.  I filled the shelves with our leftover decor and a picture of my boys from about 4 years ago at the Dallas Arboretum in October.  I LOVE that picture of them and it fits in perfectly with the decor :)


Whew!  I think that about covers it!  I still need to add our silhouette mice to the stairs going to the media room.  The boys have a few little Halloween cutouts in their room, but nothing to write home about.  I usually don't decorate our room for Halloween, but you can bet I will for Christmas this year.  I'm getting ahead of myself ;)  

I'll post some pictures of the porch next week...it's almost there!!!

If you wanna take a peek at how our Halloween decor has evolved over the years, you can check out those posts below.  That's actually scarier than Halloween itself, lol!